USER MANUAL
This keyboard is a driver-free production, It's based on a standard windows keyboard. You can just plug and play on Linux,macOS, Windows, and many platforms after setting up on a windows7(or higher version windows) PC. There is no software installation, background, or repetitive setting up, and it will not be recognized as a storage device. The keyboard has a memory function. You don’t need to set it up next time. After setting, the software can be closed or deleted as you wish. One computer can be used with multiple keyboards with them set up one by one(plug one in then set up it, unplug, and plug in another one ...).The keyboard supports up to 6 keys to be pressed concurrently, the default setting is 123..., to change the key value, please refer to the following tutorial.
Using Non-Windows System: You should set the keyboard on a windows PC (7 or above) first, then it can be used by plugging into a non-windows system computer. If you're using macOS or iOS, use the "win" key instead of the "command" key, and "alt" instead of the "option".For example, the Hotkey of copy is "command + c" in macOS and iOS, then it is "win + c" when you're making settings.
TUTORIAL
( The manual accompanying our productions is just a brief tutorial )
Step 1
Click the link to download the zip file, and copy the zip file to D:/ (better not to put it on C:/ or Desktop )
Step 2
Turn off anti-virus software, and unzip the file ( you need to install related software like WinRAR, and 7zip first ). Maybe your anti-virus software will alert you there is some threat because of the third-party software installation, skip it if you trust or maybe open it in a VM if you don't.
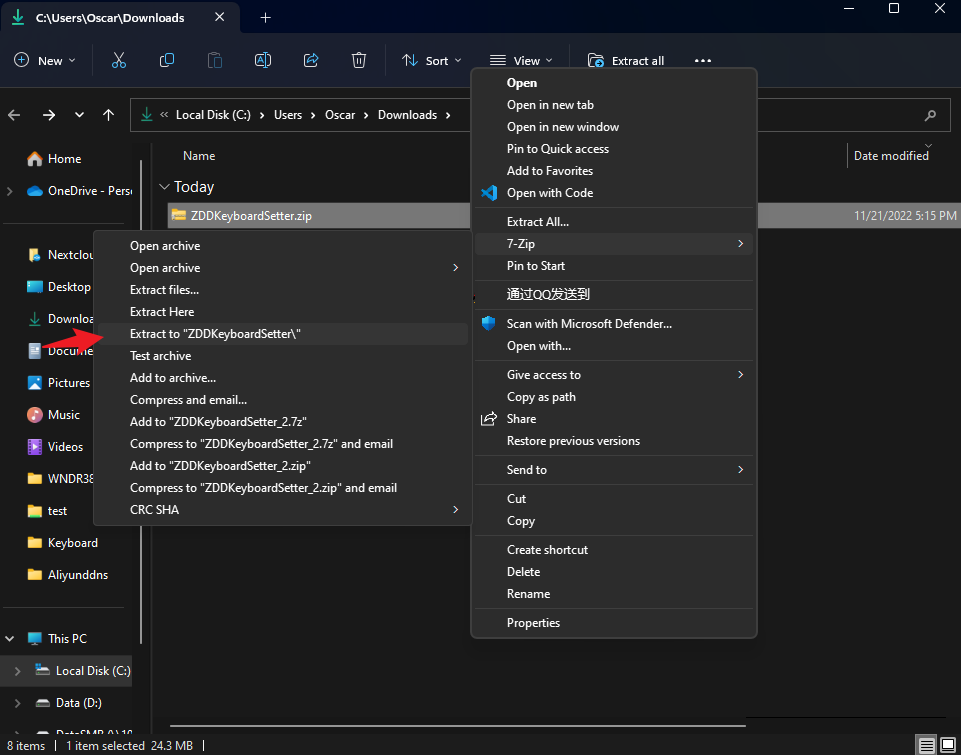
After unzipping, as shown in the picture, some people may get garbled characters, it's ok, just find the .jpg file and .exe file.

Step 3
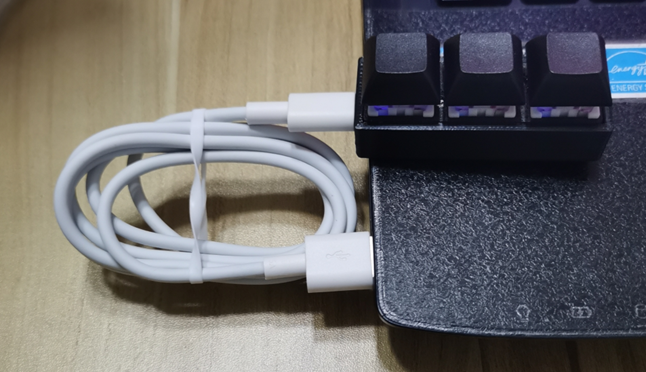
Plug one end of the accompanying cable into the keyboard and the other end can be directly plugged into the USB port of the computer ( better be the USB on the back side of the box, which means the port on the motherboard ), as you can see in the picture, the 3-key keyboard is plugged into the USB port of the laptop.
Step 4
Double-click the exe file to open the software and open the key mapping picture ( we will call that "keymap" later) as well.

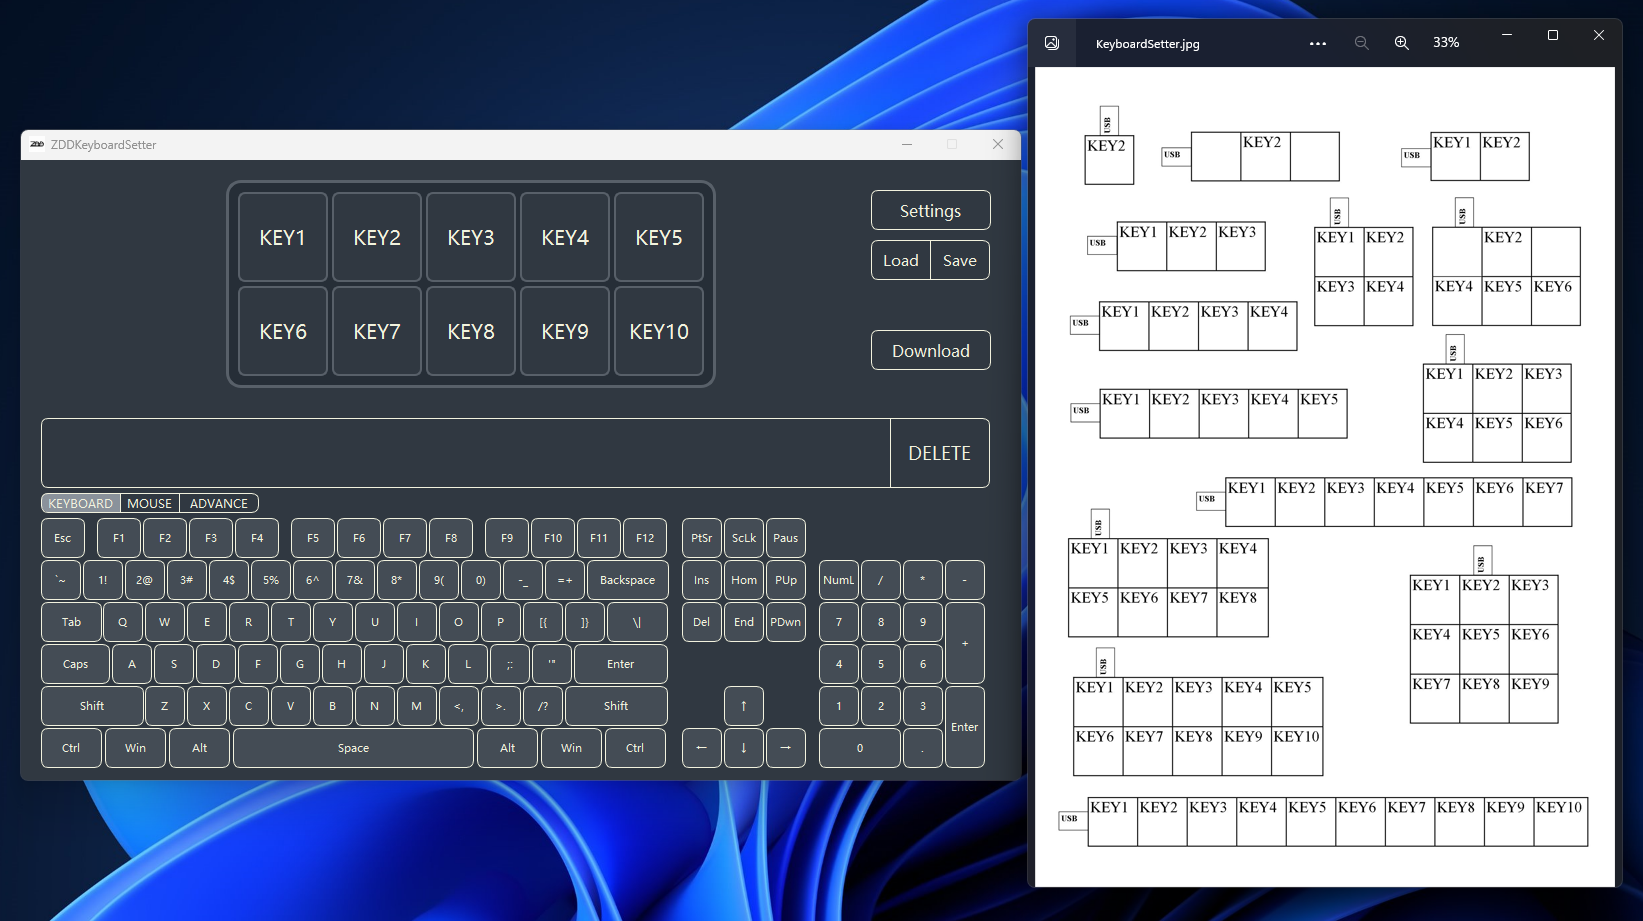
Assuming you bought a 3-key keyboard, you can find this icon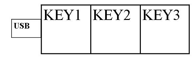 , the "KEY1" is referred to as KEY1 in the software, "KEY2" is KEY2 in the software, and so on.. simple, right? You may wonder why there are 10 keys in the software, Just forget about it, take care of these 3.
Step 5
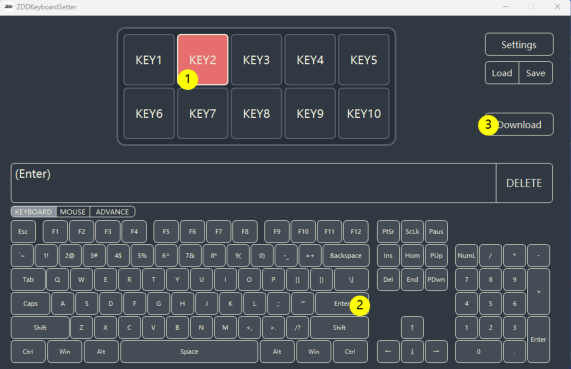
Assuming you want to set up a Normal key, For example, you bought a 1-key keyboard, and you want to set the action "Enter"( "return" in macOS or iOS ) to the key, first, you can find in the keymap the referring key in the software is KEY2, then click ( when we mention 'click' that means left single click ) KEY2 in the software, move your mouse away, the KEY2 in the software is still turned red meaning it is selected, and then click the Enter in the virtual-keyboard in the software as it is shown on blow picture, finally, click Download to make the keyboard aware that you make changes and it will save your configuration permanently until next click of "Download" button.
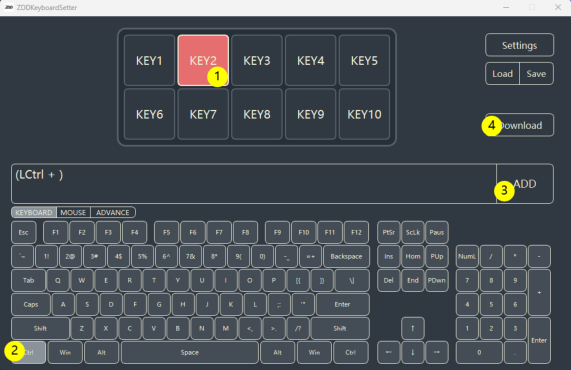
Tips: If you want to set up single action like Ctrl, Shift, Alt, or Win, For example, single "Ctrl", you should make sure to click ADD button after clicking Ctrl on the virtual keyboard as is shown in the picture below, and then you can click Download button to make changes saved.
Step 6
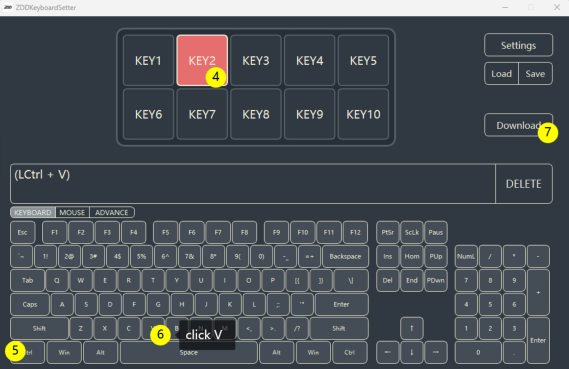
Assuming you want to set up a Hotkey ( which means Ctrl, Alt, Shift, Win random combination + a normal key ), For example, you bought a 2-key keyboard, and you want to set the action "Copy" ( Control + c in windows, command + c in macOS or iOS ) to KEY1 and "Paste" action to KEY2, the setting steps are shown in the picture below. After following the steps in the picture, finally don't forget to click the Download button. You should notice that do not click "ADD" button when you wanna set up a Hotkey.

Step 7
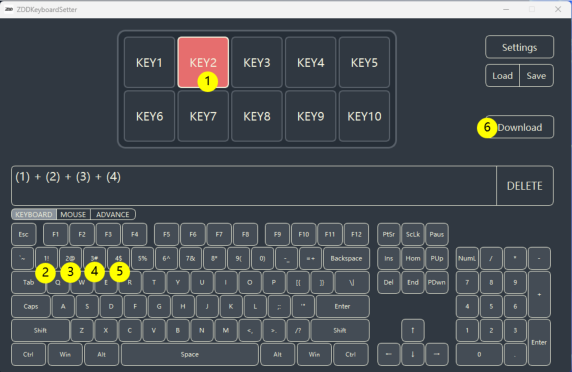
Assuming you want to set up a Macro ( a macro can substitute your hands' press and lift multiple single keys continuously ). For example, if you bought a 1-key keyboard, and you want to set one-key 1234, just follow the steps in the picture below. These kinds of string inputs don't need to add delay.
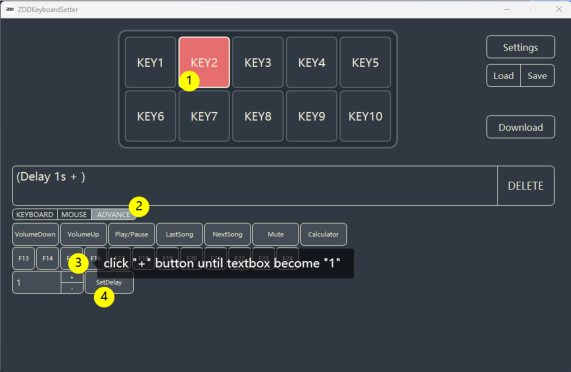
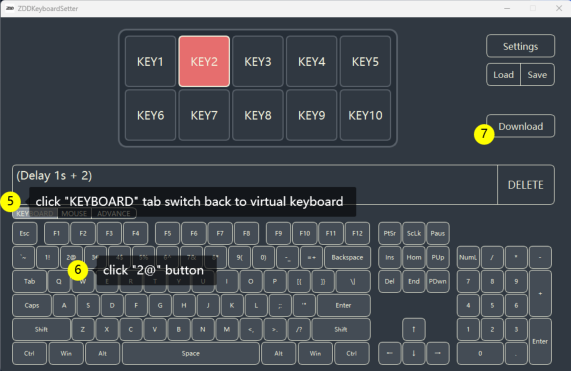
However, some environments need to wait for a while then press another key, for example, you should add some delay between 2 "Enter" actions to give your network or computer some time to send or process your instructions, in this example the delay will be set to 1 second before press "2", you should click the ADVANCE tab first to switch virtual keyboard to advance modules panel, then click "+" button on the left of the "Set Delay" button, click "+" button multiple times until the text box on the left become 1 ( the unit of delay is second ), then click the "Set Delay" button and then click "KEYBOARD" tab to switch the panel to the virtual keyboard, then click "2@" button on the virtual keyboard, and finally click the "Download" button.
Step 8
Using the function "Load" and "Save" can modify the settings which you saved before more conveniently, you can save your configurations for next-time editing. The file generate by the "Save" function consists of 10 keys ( all shown keys on the software ) configurations, not only the selected one, All 10 keys' configurations will change when you "Load" the saving file! keep clear about that.

PROBLEM-SOLVING
- If you see "Windows has protected your computer" alert when you open the .exe file, just try "Run as administrator".
- Make sure you are using the original cable or android data cable; If the audio output works well, you would hear sounds when you plug or unplug our keyboard.
- When the software tells you "no device found", and presses any key on the keyboard gets nothing output, maybe there is some problem with the connection, plug it in again, or use another USB port.
- After clicking the "Download" button, if the message box alerts you "Download successfully, but there are some problems", plug the keyboard in again, or use another USB port.
- When the software tells you "no device found", but you get output when you press any key on the keyboard, you may need to change to another USB port.
- If nothing works using the above methods, you may need to change to another windows computer and do the above method again. If this fails too, then contact customer services.
SETTINGS' NOTES
- If you need to set up multiple keyboards, please plug only one keyboard in and set up it then unplug this one and then plug in another, this is because the software can only access one keyboard at the same time.
- The device is not working? Maybe this is because of incorrect settings. For example, a "Copy" action is "
 " NOT the "
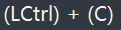 ", refer to Step 6 of the tutorial, or maybe you just forget to click the "Download" button, or this key has no configurations, or maybe you map the wrong key, take a good look at keymap.jpg, refer to the Step 4 of the tutorial.
 - Get no response when setup a key on the keypad area but it works on the standard layout? maybe it's because the num lock is disabled.
- The characters on the virtual keyboard are uppercased, they are just a name, and they have no relation to real output. For example, if you set up a "
 ", but the computer has caps lock disabled, then the output will be "a". If you want it to output "A", you need to make settings like this: "
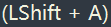 ".
". - Multi-media keys, mouse keys, and F13~F24 keys are the same as normal keys like "enter", and "a", don't be confused about that.
- Remember to click the "delete" button to clear all configurations which you make before until this KEY becomes unset status. For example, you set up a certain KEY to "", but now, you wanna change it to "
 ", you need to click the "
 " button first, and then click "
 " on the virtual keyboard.
MACRO NOTES
We prescribe a macro as a key that has a delay such as "
 ", or is NOT a normal key such as "" NOR a hotkey like "
 ", we call all of them that satisfied the condition we mentioned just now a macro. When one of your macros is running, all keys on the keyboard will be disabled until the macro end.
There are 3 limits to our keyboard:
- Ctrl, Alt, Shift, and Win these 4 special keys are limited up to 10 in macro for the whole keyboard;
- The limitation of delay is up to 10 for the whole keyboard, each of the delays can be set up from 0.1sec to 25 sec.
- You can configure up to 34 normal key serials for the whole keyboard, for example, if you have a 2-key keyboard and you set one of the keys a 30 normal keys macro, then there are only 4 left for another key, this limitation will be triggered finally if your settings not hit above two limits.
These 3 limitations are not for a certain key, it's the hardware limitation that exists on every version of our products. You can not continue setups when you hit any one of the 3 limits, so, please take good care of using these precious flash spaces, for example, setting up a delay, you don't need to add a delay on a normal continuous string input like "abcdef".
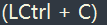
Macros are time-consuming programs for our tiny keyboard, so there is 30ms( 0.03sec ) lag between every key, for example, in the macro "
" there is 30ms' lag between "( Left Ctrl ) " and the "( C )".Multi-media keys and mouse keys are not allowed in a macro, a macro only allows normal keys, special keys, and delay. Maybe you think the macro function is just a piece of shit, and so do we, so, we are working on a better keyboard now.
When you are making macro setting like "
", this is a simple replacement of pressing "2" key on a normal keyboard using your finger; If the setting is "", that means wait for 1sec and then press the "2" key then release it.You can trigger a macro continuously by pressing and holding the key on the keyboard, for example, if you set up a macro "123" if you press and release the key, the output will be "123", but if you hold that key, you will get "123123123123....".